What Are Initializers?
Attaching an initializer to a client component gives you the ability to customize all its Init arguments using the Inspector window – with a lot of enhancements over what’s possible using Unity’s serialized fields by default.
While registering global and local services makes it convenient to deliver the same service object to many clients, an initializer allow you to control exactly which Init arguments should provided to one specific client instance.
When To Use Initializers?
Attaching an initializer to a MonoBehaviour<T…>-derived component can make sense when:
- Hand-Picked Services – You want to configure instance-specific Init arguments, instead of registering all of them as multi-client services.
- Replace Global/Local Services – You want to swap out the global or a local service that the client would otherwise receive with a different object.
- Cross-Scene References – You want to assign Init arguments from different scenes.
- Prefab Instance References – You want assign Init arguments from instances of prefabs which are only instantiated at runtime.
- Full Interface Support – You want to configure interface type Init arguments using the Inspector without limitations – components, ScriptableObjects and plain C# objects are all supported.
- Value Providers – You want to assign value providers to resolve Init arguments dynamically at runtime.
- Edit Mode Null Guard – Initializers automatically validate that no Init arguments are missing both at runtime and in Edit Mode – MonoBehaviour<T…> components can only do this at Runtime.
- Separation of Concerns – If your components depend on objects which Unity can’t serialize automatically, you can put all the complex custom deserialization code into the Initializer class (or the value providers that you assign into them), allowing your client components to be free from unnecessary clutter.
Additionally, attaching an Initializer to components which don’t derive from MonoBehaviour<T…> can make sense when when:
- Automatic Service Injection – You want global and local services to be automatically delivered to them.
- Null Guard – you want to be automatically informed about missing Init arguments in Edit Mode and at Runtime.
- Async Initialization – Initializers can automatically disable clients until all the object that they depend on are ready.
- Unit Testability – If you make your components implement IInitializable<T…>, it’ll become trivial to pass Init arguments to them during Edit Mode unit tests.
Creating Initializers
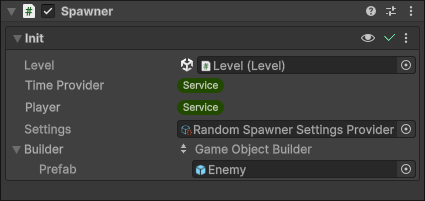
The Init Section
The easiest and recommended way to create an Initializer for a component is to have Init(args) generate it for you automatically.
When you have a component that derives from MonoBehaviour<T…> or implements IInitializable<T…>, an Init section will automatically appear at the top of the components of that type in the Inspector.
To generate an Initializer for the a component, click on the + button in its Init section and select Generate Initializer.

This will cause a new Initializer script to get automatically generated for your component. It will be saved at the same location where your component script is located and named the same as your component class except with the “Initializer” suffix added.
If an initializer script already exists for a component, then the same + button can be used to attach an instance of the initializer class to the component instead.
Context Menu
Another way that you can generate an initializer script for a component is by opening its context menu in the Inspector window and selecting Generate Initializer….
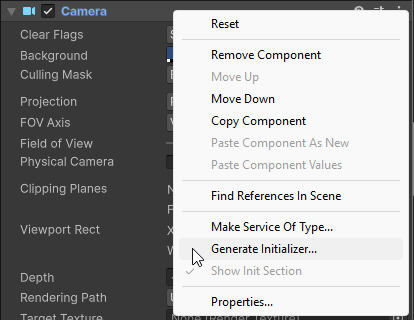
This can be useful in cases where a component does not have an Init section drawn in the Inspector – for example, because it is a built-in or third-party component, which does not derive from MonoBehaviour<T…>.
Script Asset Context Menu
Another option for generating an initializer for a class is by selecting its script asset and selecting Generate Initializer from its context menu.

This can be useful if you need to generate an initializer for a class that is not a component – for example a plain C# object which you will be attaching to a GameObject using a wrapper.
Manually
Initializer<T…>
It is also possible to create initializer classes manually using code. In most cases all that you have to do is:
- Define a class that derives from a generic Initializer<T…> base class.
- Set the first generic argument type to be the type of the initialized component.
- Set the generic type arguments that follow it to the types of its Init method parameters.
For example, to define an Initializer for a Player component that derives from MonoBehaviour<IInputManager, Camera>, you would write the following:
class PlayerInitializer : Initializer<Player, IInputManager, Camera> { }
InitializerBase<T…>
Initializers that derive from Initializer<T…> can hold and serialize Init arguments of UnityEngine.Object, types, as well as any types that Unity can serialize with the SerializeReference attribute. This includes interface types, and even in cases where the Init parameter is an interface type and the assigned value is a reference to a UnityEngine.Object type object.
This means that Initializer<T…> classes have all the same limitations that fields with the SerializeReference attribute have when it comes to serialization: most notably the lack of support for serializing generic types (with the exception of List<T>).
In cases where you need an Initializer to serialize an object that isn’t supported by SerializeReference, you can derive from InitializerBase<T…>, implement the properties for all the arguments, and handle serializing them however you want.
using System;
using System.Collections.Generic;
using System.Linq;
using Sisus.Init;
using UnityEngine;
using Object = UnityEngine.Object;

public class DatabaseInitializer : InitializerBase<Database, Dictionary<string, Object>>, ISerializationCallbackReceiver
{
    protected override Dictionary<string, Object> Argument { get; set; }

    [SerializeField]
    private SerializedElement[] serializedElements;

    void ISerializationCallbackReceiver.OnBeforeSerialize()
    {
        serializedElements = Argument.Select(element => new SerializedElement(element.Key, element.Value)).ToArray();
    }

    void ISerializationCallbackReceiver.OnAfterDeserialize()
    {
        Argument = new Dictionary<string, Object>();
        Array.ForEach(serializedElements, (element) => Argument.Add(element.key, element.value));
    }

    [Serializable]
    private sealed class SerializedElement
    {
        public string key;
        public Object value;

        public SerializedElement(string key, Object value)
        {
            this.key = key;
            this.value = value;
        }
    }
}
WrapperInitializer<T…>
To define an Initializer for a Wrapper, derive from the WrapperInitializer<T…> base class, with the type of the wrapped C# class as the first generic argument, followed by the types of its constructor parameters (assuming that a constructor is being used to pass in the object’s dependencies).
Secondly you need to override the CreateWrappedObject function with parameters matching the constructor parameters of the wrapped class, and implement the logic for creating the wrapped object.
public class PlayerInitializer : WrapperInitializer<PlayerComponent, Player, IInputManager, Camera>
{
    protected override Player CreateWrappedObject(IInputManager inputManager, Camera camera)
    {
        return new Player(inputManager, camera);
    }
}
Circular Dependencies
Note that when using constructors to initialize your wrapped objects, it’s possible to run into an issue with circular dependencies. For example, if Player’s constructor requires an InputManager argument, and InputManager’s constructor requires a Player argument, then it’s not possible to create either object.
This issue can be resolved by splitting creation of the wrapped object into two phases: first getting/creating the instance, and secondly passing to it its Init arguments.
Get Or Create Instance Step
To enable the first step to happen, you need to also override the GetOrCreateUnitializedWrappedObject function.
public class PlayerInitializer : WrapperInitializer<PlayerComponent, Player, IInputManager, Camera>
{
    protected override Player GetOrCreateUnitializedWrappedObject()
    {
        return new Player();
    }

    protected override Player CreateWrappedObject(IInputManager inputManager, Camera camera)
    {
        return new Player(inputManager, camera);
    }
}
Alternatively if you add the [Serializable] attribute to the wrapped class, then the Wrapper will hold an uninitialized instance of it by default, from which the default implementation of GetOrCreateUnitializedWrappedObject can automatically retrieve it.
Init Step
To enable the second step to happen you need to have your wrapped class implement IInitializable<T…> for receiving the initialization arguments in a deferred manner.
public class Player : IInitializable<IInputManager, Camera>
{
    private IInputManager inputManager;
    private Camera camera;

    public void Init(IInputManager inputManager, Camera camera)
    {
        this.inputManager = inputManager;
        this.camera = camera;
    }
}
With this two changes Init(args) can get past the circular reference by first creating the Player instance without initializing it with its Init arguments, then creating the InputManager instance with the Player instance passed to it, and then finally initializing the Player instance by passing in its Init arguments.
PropertyAttributes And Initializers

Sometimes you may want to customize how the Initializer arguments appear in the inspector by adding PropertyAttributes to them.
To do this, you will need to add a private nested Init class inside the Initializer, and then define a field for each Init argument accepted by the Initializer’s client with their order and types matching those of the arguments in the client’s Init method.
Any property attributes you attach to these fields will then get used when the corresponding initialization arguments are drawn in the Inspector.
public class PlayerInitializer : Initializer<Player, IInputManager, float>
{
   #if UNITY_EDITOR
   private class Init
   {
      public IInputManager inputManager;

      [Range(0f, 100)]
      public float speed;
   }
   #endif
}
Alternatively you can derive from InitializerBase<T…> which gives you the ability to manually define serialized fields to hold the data for all the Init arguments.